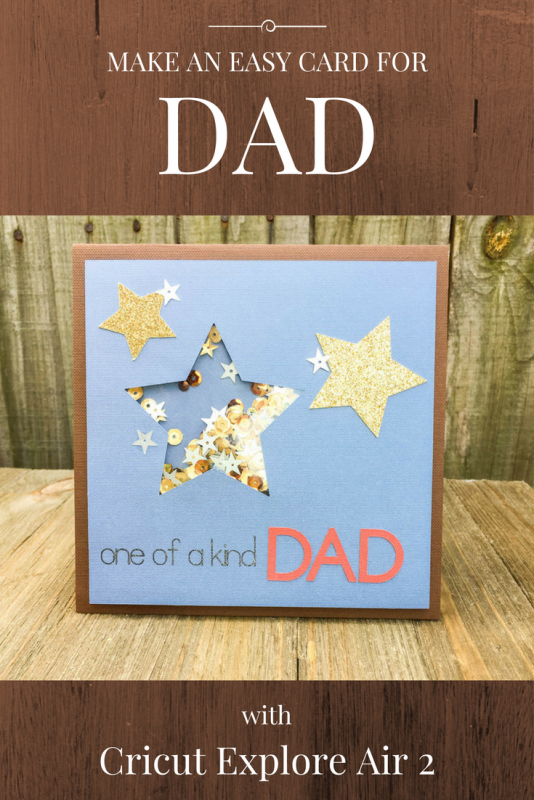
Easy Happy Father's Day Shaker Card with Cricut Explore Air 2
One of my favorite things about the new generation of Cricut machines is the way that Cricut Design Space makes it easy to visualize what I am cutting on my Cricut Explore Air 2 machine, and to place your cut shape precisely where you want it in relation to other elements. Without that ability, this Father's Day Shaker Card would not be possible. With it, the card can be created and cut perfectly in a matter of minutes!
[Disclosure: I am an influencer for Cricut. Some links in this article are affiliate links that pay this site a commission when a purchase is made after a click.]
Supplies:
Cricut 12x12 Cardstock - Wildflower & Southwest
Sequin Mix
page protector (scrap)
foam adhesive tape
red liner tape
clear drying liquid glue
This card is created from several colors of Cricut cardstock, along with two other specialty items from the Cricut supply closet. One (which I am totally in love with) is the black 0.8 gel glitter pen from the black Multi Pen Set. And because that just wasn't enough glitter, I also decided to use the gold sheet from the Classic Sampler of Cricut Glitter Cardstock!
I designed this card from scratch in Cricut Design Space, and it's surprisingly easy! It's simply a series of basic shape and text elements layered together and with their properties set to make them behave a certain way to create the design I want. Below on the right side, you can see all of the layers of the design.
Since I wanted to make a 6x6 card with a 1/4" border showing all of the way around this blue center part, I started by setting my canvas to be a 5.5" square. I colored it cream - that is what you see peeking through the large star.
To create my background "paper" I first drew a square exactly on top of my canvas, and colored it blue. Then I added my 3 stars to the top of the card front's design, making two varying smaller sizes and one larger. (We'll get to that really big blue star in a minute.) I colored the smaller ones a bright yellow to signify the gold glitter paper.
Once I had the three stars in place how I wanted them on the card front, I turned off the visibility of the smaller ones. Then I drew a box with my mouse around the blue paper and the large star on the card and hit the "slice" button. This cut the star out of the blue background, and I moved the blue star that it created off of the card front and to the side. Once there, I enlarged it quite a bit to serve aa a backer for my shaker box.
Finally, I added my text elements. For the "one of a kind" I made sure to choose a "writing" style font and set my text to writing. I chose a nice clean sans serif Cricut font in a deep red color to cut the text for DAD. Then I turned off the visibility of the "DAD" letters, drew another box around the blue background, the star cut out, and the "one of a kind" writing, and clicked "attach".
I made the yellow stars and "DAD" text visible again, and the card design was done. I hit my "Go" button and started feeding my different papers into my Cricut Explore Air 2 machine. I almost forgot to insert my pen in the machine before cutting the blue piece, but fortunately Cricut Design Space is smarter than I am and reminded me!
After my pieces were cut, I just assembled them into a shaker box. A piece of scrap page protector went on the back behind the star opening to serve as the front of my shaker card. Then I began cutting pieces of foam adhesive tape to place two layers around the edges of the star shape on the back of the card (with the page protector scrap between the cardstock and the foam tape). After building my foam tape "walls" for my shaker box, I filled it with the metal colored sequin mix, peeled the backer tape from the foam tape, and pressed the large blue star down on top of it to seal the sequins in.
Once the shaker was done, it was easy to adhere the rest of the elements (DAD text, glitter stars, and a few star sequins) to the front of the card. Then with a little more foam tape put along the edges of the back of the blue cardstock, I adhered it to a brown card base. (I made the 6x6 card base by folding a 6x12 piece of cardstock in half).
This fun and easy Father's Day shaker card will delight Dads and Granddads (and the kids too)! This same technique can be easily adapted to working with other shapes to make shaker cards for a variety of occasions and I can't wait to see how many other variations I can make. I also look forward to trying this technique to write titles and make "peek a boo" windows in elements for my 12x12 layouts.
Don't underestimate the basic shape tools in Cricut Design Space. They may be "basic", but with some imagination, their possibilities with your Cricut machine are limitless!
This is a sponsored conversation written by me on behalf of Cricut. The opinions and text are all mine.


