Tutorial: Sun Mosaic Wall Art
I love making wall art pieces - they are so fun to make, and they let you look at your art all the time when you display them! This sun mosaic wall art was made for the Buttons Galore booth at Creativation, but now has a permanent home in my home for me to enjoy.
[Disclaimer: My company, Nally Studios, is the social media & blog manager for Buttons Galore. I am also part of blogger programs for Cricut and Plaid, who provided some product used in this article. Some links in this article are affiliate links that pay this site a commission at no cost to you if you make a purchase after clicking.]
Supplies:
1/4″ x 2′ x 2′ Birch Plywood Sheet
Cricut Explore Machine (Amazon.com, Scrapbook.com, Cricut.com)
Sun cut file
Buttons Galore "Mango Madness" Color Blends (quantity: 6) (Amazon.com)
28 Lilac Lane Candy Corn embellishment bottle (quantity: 2-3) (Amazon.com)
Plaid FolkArt "Vintage Mustard" Home Decor Chalk Paint (Amazon)
white clear drying glue
Ranger Glossy Accents
scrap cardstock (for making template)
sandpaper
This project is somewhat time consuming, but none of the techniques are especially difficult. The most challenging part is doing the cutting with the jigsaw, but if you aren't too intimidated by power tools and take your time, that is very manageable.
To start my sun, I needed to make a pattern to cut my wood with. I found a sun cut file in my Cricut Design Space software, and sized it to 17" across. This is too large to cut out on the Cricut, of course, so I use the rectangle basic shape tool to cut the design into quarters. Then I cut each quarter of the design out, and taped them back together to make my pattern!
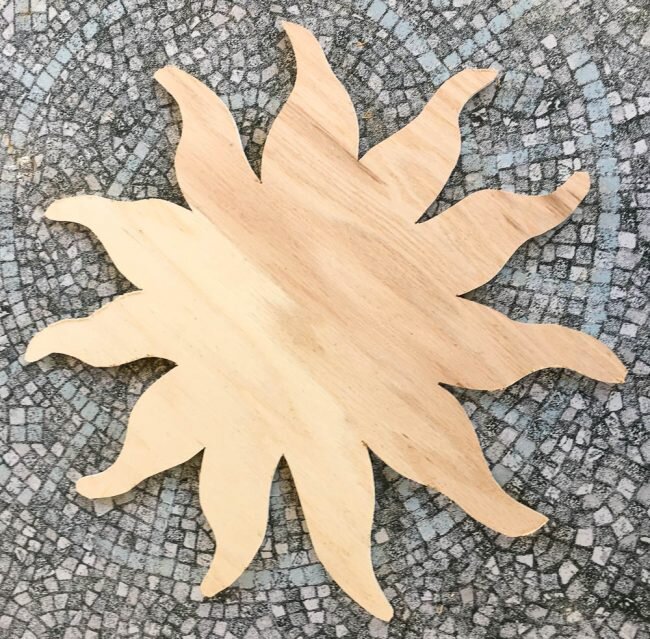
Once the pattern was assembled, I taped it in place on my plywood and drew around it with a pencil. I removed the template and set it aside to use again.
To cut the sun out, I worked from the points down towards the center of the sun for each cut. Then I used the jigsaw to round off the tip of each ray.
After all of the cutting was done I was left with a rough sun shape. I cleaned up the edges and smoothed out the shape by sanding it with various grits of sandpaper until I got it to the shape that I wanted and it was smooth.
I wanted to seal and cover up the bare wood despite the fact that it would mostly be covered by the button mosaic, so before I started putting buttons down I painted the surface and the sides with Plaid chalk pain in a nice mustard color. This way, if any of the surface shows through (and all of it will on the sides), it will be a color that coordinates with the design and it won't look unfinished.
The next step was to draw pencil lines approximately down the center of each of the rays. Before I started putting down the buttons, I sorted the "Mango Madness" buttons to remove the darkest orange ones. Then, using these dark colored buttons, I started gluing buttons along the lines I had drawn, stopping where the rays met the center area of the sun.
Once I did the lines on the rays with the dark buttons, then I started on filling in around them with the lighter buttons from the Mango Madness color blend.
For some of the smaller areas near the points of the sun's rays, I used flat back pearls from the Candy Corn embellishment bottle instead of buttons. When I was done filling in the rays with buttons I was left with this:
The next step was to use more of the dark orange buttons to create a small circle in the middle of the sun. After that was done, I began filling in around it with the rest of the mango buttons. I worked one small area at a time so that my buttons wouldn't get pushed and moved too much while the glue was drying.
To make it look more finished, I added beads and sequins to my sun mosaic. I sorted the seed beads from the candy cane embellishment bottles by color before I started. Next I started putting dots of glue into the small open areas between buttons, and pushing beads into it as filler. The orange beads went into any opening that touched a dark orange button, and the lighter seed beads went into other openings.A few openings between buttons were big enough for flat back pearls so I used those.
I also added beads to fill in along the edges of the rays in the gaps between the buttons. I used my fingers to mold the beads into shape along the edge after pushing them into a bed of glue to hold them.
I thought my sun needed a little more sparkle, so for a finishing touch I added some of the dark orange sequins on top of the darker buttons using Glossy Accents.
To hang this on the wall, I plan to use Command Hook picture hangers, which will remove any need for me to attach a hanger to the back of my wall art piece.
This same technique of creating a pattern and cutting it out with your jigsaw to create a button mosaic base could be applied to any shape that you can make with your Cricut...what shape would you like to make?


