Organization | Tour of My Scrap Room 2014
About a year ago, after spending some time with my scrap space in the kitchen, I decided that it was time to move back into my own space again. I moved back into the spare bedroom that has long been my scrap studio and office. The decision a few years ago to move my office operations into a shared space with my husband meant that this time, the spare bedroom could be devoted solely to my creative work. Rather than just go back to a modification of the previous arrangement, I decided to take the opportunity to redesign the room from the ground up (although making use of a few pieces that I did already have, for economy's sake).
It took a year start to finish, but finally - Here's the results!
Nancy Nally Scrap Studio
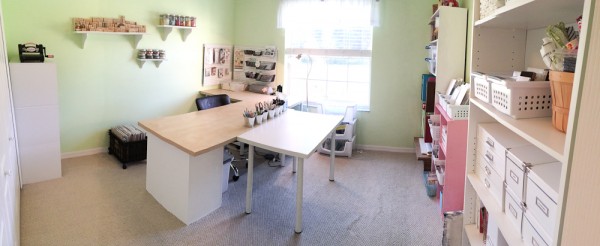
The room is about 11x11 in size, with a lighted ceiling fan in the middle of the room. The walls were painted this pale green years ago, shortly after we moved in. The window looks out over the front yard, which lets me watch the world go by while I work, and is covered with 2" faux wood plantation blinds (like the rest of the house) and a lace valance. Three of the four walls are drywall over concrete block (the closet wall being the lone exception), making it difficult to hang things on them.
The tables are pieces from Ikea's Vika Amon modular table/legs collection. It has been replaced by a similar line that is now available, though. The large birch area is for my workspace. The smaller white table provides workspace for a second "guest" like my husband or daughter without compromising the ability to move around the room as much as if I had added a second larger table. I also use the second table for a variety of other tasks: "staging" and organizing projects, and packing and unpacking my camera gear that is stored in the closet, and photographing items for the website.
For a closer look, let's start at my desk work area.
As I look forward while seated, this collection of tools and supplies (above) is in the middle of my desk. The buckets are from Target's Dollar Spot awhile back. They hold a variety of frequently used items, from pens and scissors and small tools to paint brushes. The baby wipes are used for cleaning up stamps (and my fingers!), and the sticky notes and index cards are used for taking notes and for practice stamping and other such tasks. In the far left of the photo, you can just barely see my black desktop Ott Lite lamp - essential for creating a night in a room with poor overhead lighting.
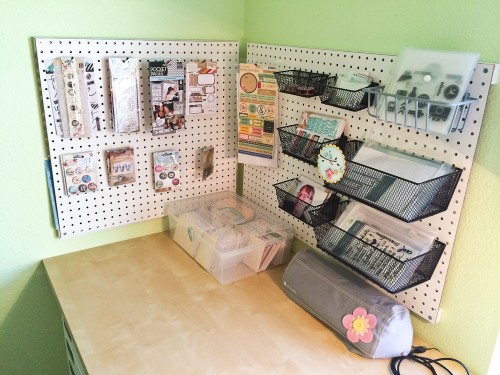
If I turn to my left, I see this work area. which contains my storage box of Project Life and related supplies, my Silhouette Portrait machine, and a variety of stamps and embellishments. Baskets hold some of my most frequently used stamp sets, and some of my most recent embellishments are on hooks so that I can see and remember that I have them. (I'll share more about the pegboard project later this week).
Below the pegboard area, this Ikea Alex drawer unit lives under the table to my left. On top of the drawer unit are tucked my Fiskars paper trimmer, glass cutting mat, and rubber stamping mat, all out of sight and out of the way, but easily accessible.
The drawers contain a variety of inks and stamping supplies, along with a lot of mixed media mediums and some embellishments. (Check back later in the week for details on how I arrange the drawers.)
To my right, the support of the desk is formed by another Ikea Alex unit, this one a smaller one sized to serve as desk drawers. This set of drawers is filled with my most frequently used items - pens, rulers, craft mats, adhesive, heat gun & glue gun - as well as spray inks and punches.
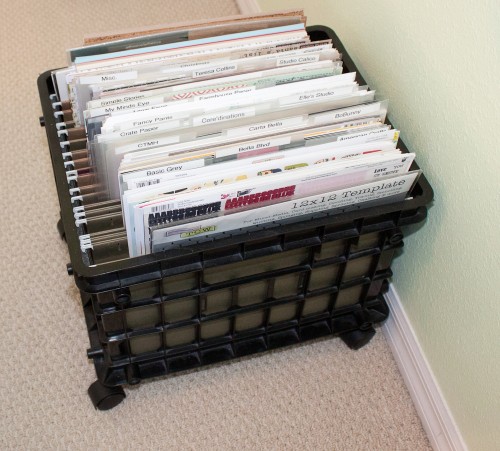
All of my drawers are labeled with chalkboard labels from the Martha Stewart line for Avery that is available only at Staples. Turning a little further to the right, on the floor next to my chair is this file crate that has wheels on it. With legal sized hanging files in it, it works perfectly for organizing my loose patterned paper and most frequently used cardstock (like white and kraft). I also have a few oversize items like 12x12 letter sticker sheets and stencils in it. Patterned paper is arranged mostly by company with a few exceptions for things like Christmas. After much trial and error over the years in different ways of sorting, I've discovered this hybrid method works best for me and I use it to sort my paper and my stamps as well.
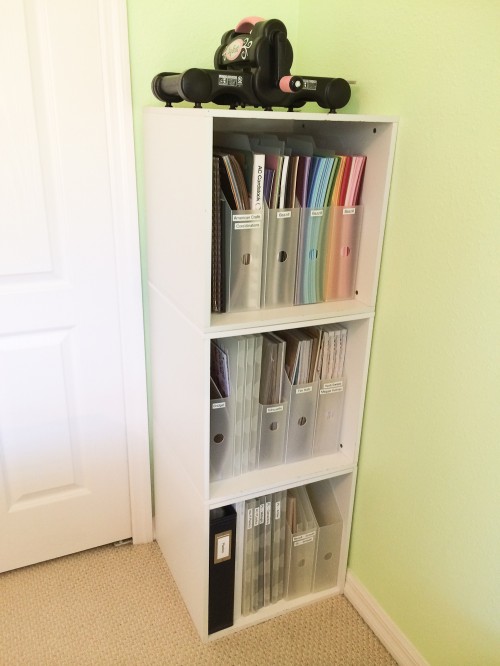
Behind the paper cart, tucked into the corner, is a tower of craft storage cubes that contains Cropper Hopper paper holders. These hold my library of cardstock, along with my pads of patterned paper, and my Project Life plastics (in the binder on the bottom and some boxes as well). The top of the tower is the perfect spot for my Sizzix Big Shot to sit, easily accessible to grab and use but not in the way when I'm not using it.
Finally, on the wall behind me when I'm sitting down are a series of decorative shelves. One holds my selection of wood mounted stamps. Two smaller ones (visible in the wide angle photos of the room at the beginning) hold flower embellishments and buttons in small jars, sorted by color. They look nice and are within quick reach if I need them.
But there's still a whole other side to the room!
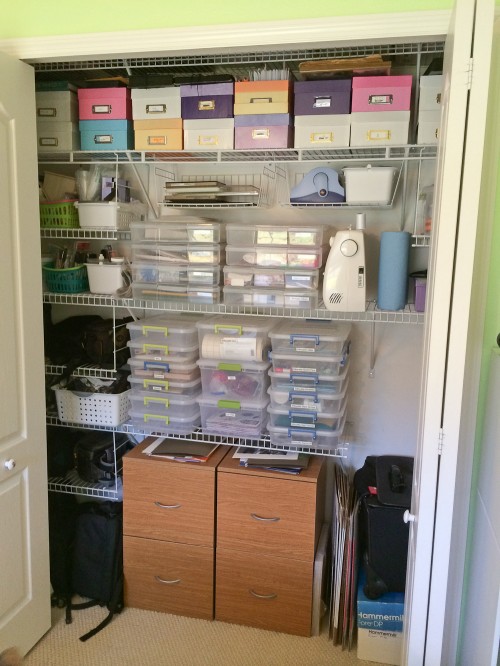
The room's closet is a combination of craft and other personal storage. The file cabinets are non-craft related storage. To the left of them is our camera gear and my scrapbook totes. The smaller plastic boxes above the file cabinets contain my Silhouette supplies (like various specialty media) and things like my stencils and some of my stamps. Above them are stacks of 12x12 storage boxes that contain projects in progress, like mini albums and other such ongoing creativity. To either side of those boxes are supply storage for things like plastic bags, adhesives, and various misc things that crafters seem to acquire.
Hanging above the plastic boxes are two mini shelves that contain Sizzix dies and my Xyron machine. The row of colorful boxes up top are my pre-digital photos that have yet to be scrapped. I will never run out....
To the right of the door when you walk in the room is this bookcase that I've had forever. It's one of two matching ones in the room. The bottom contains my craft print books and magazines. The top contains personal mementos like my Beatrix Potter figures from my childhood and the desk calendar I inherited from my grandfather.
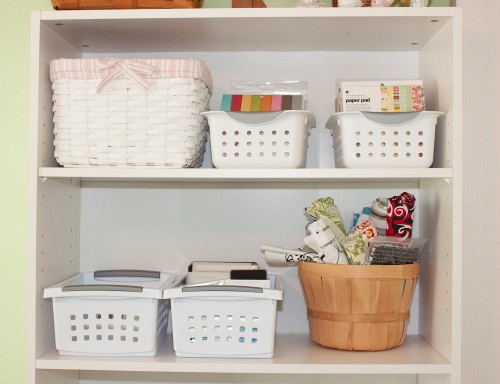
Three of the shelves contain scrapbooking supplies. This shelf (above), features a drawer unit from the Container Store and storage boxes from Ikea. The drawers hold Project Life memorabilia, ATC card bases, and my SMASH brand supplies. The boxes hold my Tim Holtz brand embellishments and keep my card blanks, envelopes, and completed cards organized. The top two shelves hold a bunch of baskets - one of my favorite ways to store things. There's a basket for fabric pieces left over from various household and crafty projects, one for Sizzix dies, and two devoted to my 6x6 paper pads.
The nice thing about using baskets like this (and the boxes in the closet) is that I can get out the container I want and move it to the table to work.
In the middle of the wall opposite my desk is this cube unit by Target (Closetmaid makes similar ones). On top is my stamp storage bins, and one shelf holds our family's Project Life kits. Mini Albums live on a bottom shelf. All other cubbies are occupied by various bins that hold embellishments. One of the bins is my daughter's scrap supplies for her Project Life album and the rest are mine. (I'll share more about the stamp storage system in an article later this week.)
I keep the bins sorted roughly by size and company. When I want to embellish, I pull them out and place them on my work tables. My alphabet stickers are in one of the bins as well, sorted by size and them as much as possible by company. I intend to use cut down file folders to create dividers for this file to make things easier to find.
The second white bookcase is over in the corner by the window. Several shelves are devoted to shipping supplies, but one has plastic shoeboxes on it that contain adhesive, ribbon, and paint in easy to see containers that are toteable to the nearby work table for convenience. Several more shelves of the unit are devoted to storing completed albums. My daughter likes to come in here and sit on the floor and pull them all off and flip through them one at a time - and then leave them in a pile on the floor!
So that is the tour of my new and improved scrap space...I'm really loving it and it is helping me get things done!
Be sure to check back the rest of the week for more articles on scrap room organization, including in-depth looks at several of the features of my new space!


